SAGEBRUSH Technology Camera Gimbal Array

MTM Scientific, Inc

Sagebrush Technology PTZ Specsheet

Figure 1: Sagebrush Technology Model 20 Specifications


This page describes the design and development of a sensor platform array for observation of aerial objects based on a Sagebrush Technology pan & tilt gimbal. The Sagebrush gimbal uses patented ROTO-LOK technology to achieve rapid ultra-smooth movement of the platform with low backlash. These units occasionally appear in resale markets, such as EBAY. A significant barrier to implementation of the gimbal was lack of technical documentation. We performed a diligent search of online resources, such as internet archives and FTP servers. Eventually, we were able to locate a technical document with enough information to communicate with the gimbal's built-in RS-232 interface. That document is here: Sagebrush Technical Manual


Communicating with the Sagebrush Gimbal via RS-232 required an easily-scripted programming language with very basic requirements.  We decided to use technology roughly fitting the era, with an IBM PC compatible ACER 710 running Microsoft QuickBASIC 4.5 (Thereby avoiding Windows, USB converters, port conflicts, software updates and a host of modern day technical headaches.) The initial baud rate and protocol of the Sagebrush unit was determined by trial and error. Thereafter we endeavored to issue command packets to the unit, but were stymied by the requirement to add a particular checksum at the end of every transmitted packet.

Fortunately, the technical manual provides an example of how to calculate the unique checksum in computer language "C". We submitted the "C" code to the AI assistant Grok, developed by xAI. The assistant identified it as a CRC-8 checksum with a unique polynomial.  We subsequently asked the assistant for similar code to be crafted in QuickBASIC, which was rapid and successful.

ACER 710 Personal Computer

Figure 2: ACER 710 Computer and Microsoft QuickBASIC 4.5 IDE

Although the gimbal does respond to each command packet when received, we found simplex communication was adequate for our purposes. The gimbal operates on 24 VDC power and generally consumes about 10 watts of power. We found it expedient to mount the gimbal on a portable tripod. Extension plates were added on both sides of the gimbal to simplify mounting cameras and instrumentation. In the world of photography these adaptable surfaces are sometimes referred to as "cheese plates".

Sagebrush Technology Pan Tilt

Figure 3: Sagebrush Technology Pan Tilt Gimbal

Our first goal with the gimbal was to control pan and tilt with a regular joystick.  We used a vintage Gravis joystick purchased on Ebay. The joystick was attached to a standard ISA game port card installed in the Acer PC. We found programming communication with the joystick using QuickBASIC to be straightforward, since the language has built-in commands for the purpose. We therefore are able to control the pan and tilt of the unit using the joystick.

Gravis Joystick Controller 

Figure 4: Gravis Joystick Controller

The QuickBASIC software code is relatively simple.  An action engine is at the beginning of the code.  The engine checks the joystick status beginning at line 25. Motion will start if the joystick is being actuated.  Otherwise, the engine checks for a command keystroke. Depending on the keystroke, various subroutines are engaged with different purposes. All subroutines end with a return to the beginning of the action engine. The loop repeats indefinitely until the ESC (Escape) key is pressed.

QuickBASIC Code for Gimbal Control

Figure 5: QuickBASIC code snippet: "Action Engine"

The gimbal has a built-in calibration routine which can be initiated with keystroke "C". The gimbal can be sent home (Azimuth = 180 degrees, Elevation = 0) with the keystroke "H". With the keystroke "S" all motion is stopped. Hitting key "P" prompts the gimbal to report current position. A keystroke "G" prompts the user to enter azimuth and elevation coordinates and then moves to the target. A keystroke "Z" swivels the gimbal 180 degrees in azimuth to track an object crossing the zenith. Sidereal tracking of a stellar object can be initiated with keystroke "T". (The tracking is only an approximation.) A keystroke "F" initiates a follow mode, which will be explained in more detail.

We considered several different methods for aiming the sensor payload on the gimbal at targets of interest.  For example, a video camera on the gimbal could provide a real time image on a monitor. The object might then be tracked manually using the joystick. Another method might be a systematic series of target coordinates, sent to the gimbal using a script. We opted to create a system using a manually operated 'master' tripod, with the gimbal configured as a 'slave' to follow the tripod's motion.

The manually operated tripod is a SUNPAK VideoPRO M4. The tripod was modified to report angular position of Azimuth and Elevation using rotary potentiometers. The elevation is reported by a Humphrey CP17 Inclinometer.  These simple and rugged units consist of an internally damped pendulum connected to a simple potentiometer. These rugged units report a voltage proportional to angle of inclination. The inclinometer is attached to the tripod head such that the sensor moves with the changing elevation angle.

Inclinometer

Figure 5: Humphrey Inclinometer for Elevation Measurement

Measurement of the Azimuth of the 'master' tripod head was more challenging. Our solution is shown in Figure 6. We attached a flexible polymer pinion M0.8 gear band rack to the base of the tripod head using silicone adhesive. This type of gear band rack is used for follow focus setups in photography. The mating pinion to the rack (available commercially in various sizes) was attached to the shaft of a multi-turn Bourns potentiometer. The pinion and rack mesh quite nicely, and the combination has a smooth movement in use. This arrangement produces a voltage signal proportional to angle. A simple plastic nub in the pinion works as a rotational stop. After adjustment the respective components were doubly-secured using silicone sealant.

Azimuth Measurement 

Figure 6: Gear and Rack Measurement of Azimuth Angle

The SUNPAK tripod assembly makes for a compact portable setup, as shown in figure 7. The tripod has a detachable mount for attaching a camera.  The tripod has extensible legs and is lightweight, with a smooth fluid-like action of the head.

Master Tripod Assembly

Figure 7: View of Tripod with dual Angle Sensors

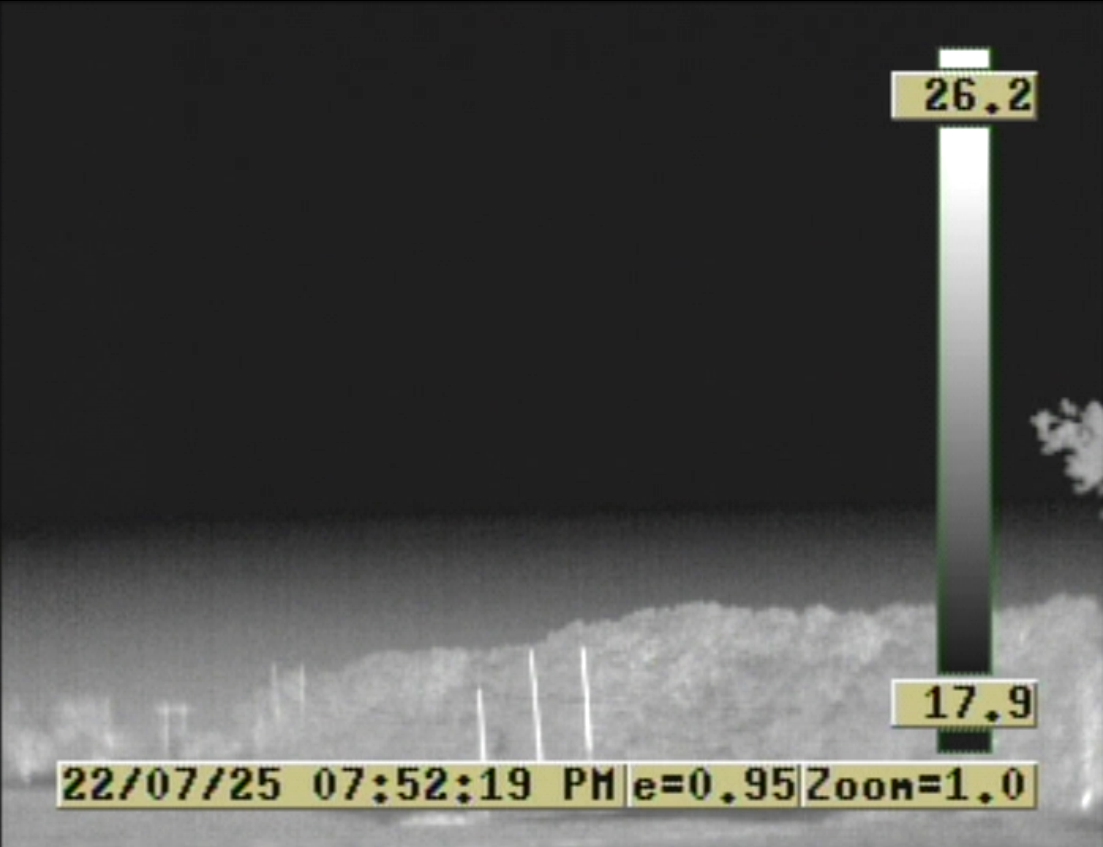
The signals from the Azimuth and Elevation sensors on the tripod are DC voltages with a 0-5 Volt range. We required a method to read the voltages using the Acer 710 computer. We opted to design a simple data acquisition board for the purpose, based upon the MAX-187 ADC. A simple multiplexer was added to the front end of the ADC to allow multiple channels (8 Maximum). The data acquistion board attaches to a standard parallel port already present on the computer. The custom PCB is shown in Figure 8.

ADC PCB for Data Acquisition

Figure 8: Data Acquisition Board using a MAX187 with Multiplexer

Here is a link to a zip file containing project information: Sagebrush Technology Gimbal Project

Camera Payload Information

Our next step was to identify suitable camera technology for documenting aerial objects. We researched and trialed several different types of cameras. Our requirements were as follows: Digital recording, feature-rich manual control options, rugged, inexpensive, widespread lens compatibility with auto-focus and vibration reduction capability. We have found the Nikon D50 DSLR, combined with Nikon telephoto lenses using the AF-S  & VR technology to work very well for this purpose. This technology dates from about 2005-2010, and used equipment is readily available at low cost in aftermarket venues. The Nikon D50 camera also has a USB port, making it suitable for computer tethering and remote control, if desired.

Nikon D50 Camera

Figure 9: Nikon D50 DSLR Camera with 55-300mm AF-S VR Lens

The Nikon DSLR family of cameras has a learning curve, and we spent much time reading the manual and practicing on airplanes and birds. The D50 camera does not offer a Live View display. Target acquisition and viewing is done through the viewfinder. The viewfinder provides a feature-rich realtime display. Battery life benefits without Live View power drain.

Having identified our camera system for still photography, we proceeded to investigate video recording devices. We saw great utility in choosing a video recording camera compatible with our existing Nikon lenses (AF-S and VR). We chose the Nikon D7000 camera from 2010, capable of 1920 x 1080 (Full HD) at 24 frames per second.  This camera has several desirable features: inexpensive (used), GPS input capable, external microphone input, simple memory expansion, extended battery-life (via a grip accessory) and the familiar Nikon user interface.


D7000 Camera for Video

Figure 10: Nikon D7000 Camera for Video Recording

We sought to include various other recording modalities in our investigation. We found that a common modification of Nikon DSLR cameras provides near-infrared capability (720 nm to ~1100 nm). The modification is a replacement of the hot filter mirror with a 720 nm infrared filter.  We purchased a modified D50 camera on Ebay at low cost for the purpose. This camera is compatible with our existing Nikon lenses. Here is an example of a daylight photograph of palm trees using the modified Nikon D50 camera.

Near IR image of Palm Trees

Figure 11: Near IR Photo of Palm Trees with Modified Nikon D50 Camera

Concurrent with the photographic and video documentation we are also planning a scan of the RF spectrum during observations. Here are additional details about our WinRadio Slow Scan Spectrum Analyzer.